

How to make a candy chute for socially-distant Halloween trick-or-treating
(FOX 2) - This week, Jill Washburn, our Jill of All Trades, helps us with a little Halloween prep for Trick-or-Treating. It is possible, says Jill, to still stay socially distant and welcome trick-or-treaters, by using a candy slide or chute.
Jill started with a 10-foot long 4" diameter PVC pipe that she picked up at one of the big box building stores for about 10 bucks. She also picked up a can of orange spray paint. Jill laid out the pipe on some cardboard, using some wood blocks to elevate it. She sprayed as much of it as she could orange. After several minutes, it was dry enough to handle so she turned it over and sprayed the rest of it.

Jill of All Trades makes Halloween candy chute
In this episode of Jill of All Trades, she shows us how to make a couple different versions of a candy chute for safe trick-or-treating this Halloween.
Once the entire pipe was dry, Jill wrapped black duct tape down it in a loose spiral. Think "candy cane", says Jill. That's all it took to make a basic candy chute.
Now let's talk installation. Jill drilled a small hole about 1/2" in from one end of the pipe. Using a piece of sturdy wire, Jill ran the wire through the newly-drilled hole and attached the candy chute to one of her porch pillars fairly high up, maybe head or shoulder height. You need enough of an incline, says Jill, to get the candy to slide through easily, but you want to be able to reach top of the chute easily, as well. Jill and her crew ran a few test runs with some candy to determine the height and slant of her chute.
Once you've figured out the placement and wired up the top, you just need to figure out how to secure the bottom. You may want to set it on a stand, as Jill did. Jill says that you can also attach it to a banister, some landscaping such as a hedge or tree, or even just set it on a chair. Just make sure you've secured it into place. That's all you need for the basic chute, or "Candy Chute #1".
What if you don't have enough of an incline from your porch to your front walk? Well, Jill and her crew got creative and kind of "turbo-charged" "Candy Chute #2"!
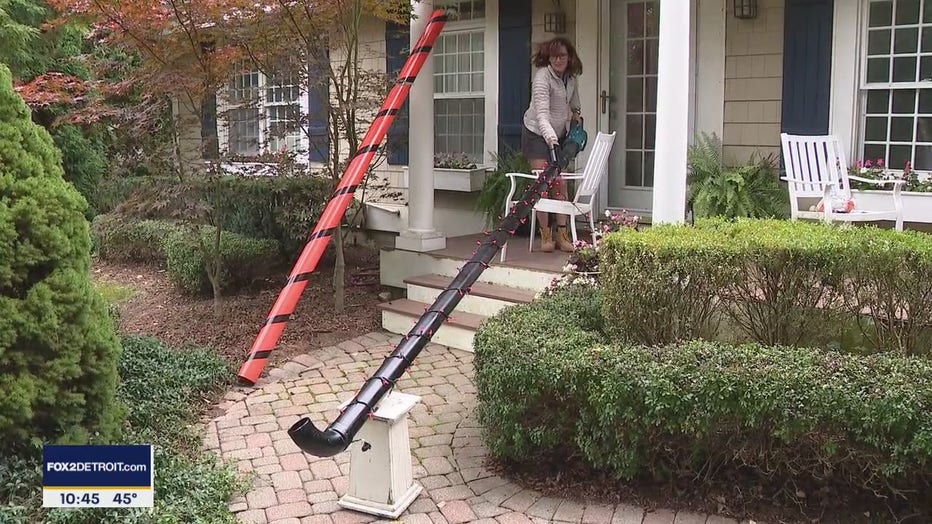
First, Jill took a 10-foot long 3" diameter PVC pipe and painted it black. When it was all painted and dry, Jill took a string of orange Halloween lights and wrapped them in a spiral down the length of the pipe. She used black duct tape to secure the lights to the pipe. That way, she can then plug them in for a fun effect on Halloween night.
Next, Jill took a 3" diameter Y fitting (Y-shaped), also painted black, and attached that to one end of the chute. Then, she attached a 3" diameter 90˚ curved piece, also painted black, to the other end. She set it up so that the Y fitting had one arm pointing up, and the end of the 90˚ curved fitting was also pointing up. This set-up allowed Jill to take her battery powered leaf blower and insert it in one arm of the Y fitting. She then turned the leaf blower on and dropped the candy for her trick-or-treaters into the other arm of the Y fitting. The leaf blower blows the candy down the length of the chute and, thanks to the 90˚ curved end, pops it up into the air. Your trick-or-treaters can then try to catch it as it falls or pick it up off the lawn.
There you have it! Two different ways to do a Halloween candy chute so that you can still hand out candy and keep socially distant.
Jill says that you can find all kinds of cool ways to decorate your candy chute. You can paint it different colors, attach fake spider webs and spiders, make it look like it's been graffitied, or find other cool, spooky ways to decorate. Let your imagination run wild.
**NOTE** Jill says that the 3" diameter pipe worked best for her leaf blower, but you may need a different size, depending on yours. Jill strongly recommends using only a battery-powered blower, so that you don't have exhaust smell affecting your candy and so you don't have to worry about cords. Plus, she says, the battery-powered leaf blowers are much quieter.
**SAFETY NOTE** Don't let anyone stand over the end of Candy Chute #2 when the blower is on, so that no one gets hit in the face with candy.
PROJECT RATING: Easy
To watch Jill take you through the projects, click on the video player above.